|
Article
10
'BIRD PHOTOGRAPHY'
An
introduction to capturing wild birds on film
By Rob L. Suisted

(Originally
published in New Zealand Outdoor magazine)
It
was bloody vile - projectile vomit a la pure fish oil! Fortunately,
most of it now lay on the ground in front of me, but the small
bit that had glued itself to my sleeve more than made up for
the bit of goo that hadn’t; especially it’s odour!
This
was not bird photography at its best, but it certainly ranks
well in my memory. Of course, I had only myself to blame -
I’d been crawling through the damp knee high Bulbinella
herb field that sat atop Enderby Island, in the NZ Sub-Antarctic
region, searching for a lonely giant petrel chick to photograph.
Many people will less affectionately know these birds as ‘Stinkers’,
I suspect largely from their famous scavenging ability, however
they are remarkable birds nevertheless, and this was partly
the point I was keen to illustrate. |
| I’d
watched, over a couple of weeks, a small gathering of giant
petrel nests as the youngsters developed. The chicks really
had little to thank their mums for though, whether by mismanagement
or design, many of the nests sat right out in the bitterly
cold roaring forties; no cover to speak of. The rather big
balls of light grey down with honking great beaks sat patiently
through sun or hail waiting for mummies to return from sea
with their next feed. |
|
My mistake was thinking......newly hatched, covered in down
and unable to walk equalled easy pickings with the camera......I’ve
got better respect now having experienced the 2.5 metre stream
of luke warm nauseous fish oil they can propel in self defence.
|

Yellow
eyed penguin. Example of how to use a small depth
of field (focus) to lift a subject out of the background (and
foreground in this shot).
Olympus OM4Ti, 400mm lens, Kodachrome
64.
|
| Mostly
though photographing birds is thoroughly enjoying. If there
was such a thing as a memory per photo index I’m pretty
sure that bird photography would score about top. I think
I’ve got more great memories from getting good bird
photos than from most other subjects.
Whether
it’s the characters of the birds themselves, or the
fact that they and other animals seem to add another dimension
to our outdoors, I’m not sure, but I am clear that they’re
very satisfying to capture on film, not to mention just watching.
I recall
sitting next to camp, high in the Southern Alps, one warm
evening watching a raucous, but respectful family group of
keas playing around on the rocks next to my tent. The light
was almost gone as I sat watching their mischievous foolery,
especially that of the two juveniles (given away by the yellow
markings around their eyes & beaks). |
|
Filming
was a fruitless exercise in the last orange light of the sundown
so I sat enjoying the spectacle amongst the tussock. The two
young birds must have only just learnt to fly and were certainly
loving the freedom from their burrow.
Both were
harassing the heck out of each other and I recall one move
that would have had my younger brother proud! One vindictive
feathered sibling casually walked up behind it’s mate
and swung a ‘round house’ kick straight for the
back of his head. What looked like expert timing, that surprised
me even more than the offender, saw the imminent victim wheel
around and grab the ‘kick boxer’s’ foot
firmly by the beak! Now, balance is a delicate thing with
only two feet; but even more so when one foot is in the mouth
of your brother.
The next
minute or so was a remarkable display of payback as one young
kea gleefully frog marched it’s sibling backwards into
humiliation.
|
|

Gannet
flying over ironsands.
Dynamic shot of Gannet in it’s environment. Attention
paid to composition of waves and flax in foreground. Dark
background gives excellent contrast to focus attention on
the subject.
Olympus OM4Ti, Zuiko 135mm
lens, Ektachrome 100.
|
| Another
amusing incident I recall was after a hard night on the turps
at the Nelson Creek pub, on the West Coast. A group of us
had just spent a week in the surrounding hills chasing roaring
stags with reasonable luck, so a good nights imbibing on the
local brew was a necessary fixture. Course no one was too
concerned about accommodation and in the wee hours we stumbled
numbly across the road into the local domain to spread out
bivvy bags. In the half light of a very cool morning, our
pounding heads were treated to a painfully shrill cry from
Paul. He’d been dreaming, dreaming he’d been riding
a horse down the main street of a wild west town when a portly
barmaid rushed out of the saloon and wrestled him from his
horse by his ear! Sitting bolt upright in his sleeping bag
uncovered the problem - one of the local wekas (ground dwelling
wood hen) had latched on to his earlobe and was trying to
drag him off as though he was tucker! Craniums thumping, we
tried to laugh - gently!
Well,
that’s enough of my reminiscencing. I guess it’s
a reflection on how important birds are to our outdoors experience.
So, how can we be more successful in catching these characters
on film? |
|
I’m
not going to cover the full on, hard core type bird photography
that requires months of preparation and construction of hides
that teeter precariously in high trees to photograph the nests
and young of lesser know common spotted sparrows.
Advice
I’ll give here is aimed as practical information that
most people can use to improve their current photos of birds
like keas, wood pigeons, moreporks etc. when they come across
them on normal trips into the hills.
There
is no doubt that tremendous images can be derived from using
hides, if you’re lucky and patient, especially with
species like hawks but it’s beyond the interest of most
people. Hides can nevertheless be exciting - one person I
know was cramped into one while photographing a harrier hawk
when the bird landed on top - the first thing they knew about
it was a razor sharp talon grasping through the hole the camera
poked out of - several centimetres from their face!
|
|

Royal
Albatross, Enderby Island.
This shot uses fill-in flash to catch the evening’s
sunset and bird in correct exposure. The result produced a
good contrasting background to perfectly outline the bird’s
form.
Olympus OM4Ti, Zuiko 24mm lens,
T32 flash, Kodachrome 64
|
| Let’s
look first at some of the techniques. Right, golden rule number
one, in my book, is that the birds’ eye must always
be in focus. Other bits can be out, but if the eye is not
crisp and clear the photo will die. This is a hard and fast
rule, I’ve never found an exception, so always concentrate
on this aspect first. Because the birds’ eye has so
much power over the final image we can consider enhancing
it’s effect. This is relatively easy with the use of
a camera flash.
Ever noticed
that most good portrait images of people have a bright glint
in the subjects eye? It’s called a ‘catchlight’
and it’s existence is intentional. The purpose can be
to inject life into the image. You can do the same with a
camera flash mounted on your camera to provide fill in flash.
The idea here is to have the flash fire a small burst (about
a quarter of full power) at the bird. The result will be a
nice glint, or catchlight, in the birds eye - helping to liven
up the image. Many modern cameras have small built in flashes
that are adequate and will do this automatically for you.
If you’re photographing on a bright sunny day you can
allow the sun to make it’s own catchlight by thinking
about the sun’s angle - try to get it coming over your
shoulder for good result.
|
|
Next is
to get a contrasting background. The problem is that many
of our birds are not brightly coloured (like keas) and tend
to sink into the background when we snap them, creating a
confusing, boring image. This is easy to fix though, you’ve
got two techniques to help. The first and most obvious is
to find an angle that will provide a background that is very
different in colour, tone or texture. A nice smooth-textured,
grey bird stands out really well against a rough textured
green background for instance.
The other
technique is to use the smallest depth of field (focus) possible.
The goal here is to make the background blurry while the subject
is sharp - note that this is really another contrast technique
to pop the bird out of the background. A spin-off of this
is that it will give you the fastest available shutterspeed
- a very important point considering that birds are very fast
movers and the faster the shutterspeed the more chance you’ll
have of a crisp shot. Also, you’ll probably be using
a relatively long camera lens and the extra speed will help
ward off the shakes (read last issue if you want to know more).
A small depth of field means that very careful focusing is
needed.
|
| 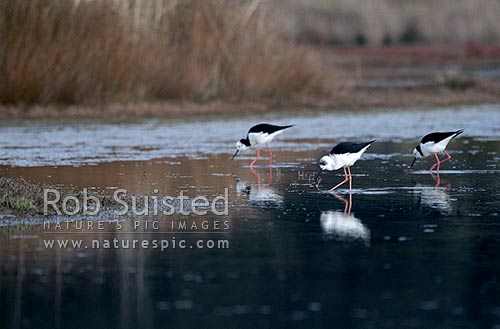
Pied
Stilts in wetland.
Illustrates the 3 subject rule described in the text.
Canon EOS, Canon 300mm lens,
Fujichrome RDP.
|
| Bird
photos tend to fall into two types: birds doing nothing; or
birds doing something. Simple, but there is often a tremendous
difference between the two types. It’s telling when
large international nature photo competitions state on the
entry form that they’re not interested in bird photos
if the subject is just sitting still. The key message here
is that waiting to catch a bird in an unusual pose or activity
is well worth it if you can. Alternatively, attempting to
photograph a bird in an unusual way also pays dividends; an
example is the yellow eyed penguin shot included. Note also
how well the subject stands out from the background due to
the small depth of field.
I find
that birds are one of the few things that are make good subjects
in bright sunlight. You’re still presented with the
problem of harsh shadows, however, the feathers of most birds
come to life in bright sunlight. A good example are tuis -
in shade the birds look pure black but as soon as sun strikes
their plumage it brings out incredible iridescent greens and
blues. Bright sun also helps get a decent shutterspeed to
freeze bird motion and camera shake if you’re using
a telephoto lens.
The multiple
subject guide is a useful point to think about also. If an
image has a single main subject (i.e. one bird) the eye will
generally settle easily upon it. Things change with more subjects.
If a photo has two equal main subjects then the brain tends
to have great difficulty in deciding which one to give attention
and the viewers’ eye will not settle. If there are three
or more subjects normally the brain will happily except these
as a group and the image will seem more settled and the eyes
will not rove the same. Therefore, if you are photographing
multiple birds, try to avoid capturing two in the frame -
check out the image of the Pied Stilts feeding on a beautifully
calm evening. |
|
Let’s
now consider equipment. Lens selection is paramount. Obviously
this is the realm of long lenses, however in most cases you
will not need a honking great super telephoto lens for most
of the birds we commonly encounter on hunting, fishing and
tramping trips. Many people own and carry a zoom lens of 80-200mm
(and many now 75-300mm) and these are perfect for most species
such as wood pigeon, weka, keas, robins, ducks, and moreporks.
My
favourite for these is often a fixed 135mm lens. At this lens
length a flash gun is still very effective which is useful.
Of course I carry and use bigger lenses, however you might
think that a more powerful lens is always preferable? They
do have limitations. The main one is their close focusing
ability, and it is important to know this limit of any lens
you use. For example, my 400mm lens is very good, but the
problem is that the closest it focuses is only 3.5 metres.
This is hopeless for small birds, such as tomtits, because
at 3.5 metres they are tiny in the photo. On the other hand,
my 300mm lens focuses right down to 1.5 metres which means
I can almost fill the photo with a small bird, even though
the lens is 25% less powerful. You will have no problem with
close focus if you’re using a 1.4x, or 2x tele-converter
as the minimum focus distance of the original lens is retained,
but the image increases in size.
Autofocus
or manual focus? Personally I don’t think there is too
much difference between the two, the trick is to be proficient
with what you have, and it helps immensely to know automatically
which way to turn focusing rings to get the right results.
|

'Electric
Pukeko'. Again, the use of a small depth of field
to lift the subject from a background that would have been
very distracting if it had’ve been in focus. Contrasting
green background helps also to outline the pukeko.
Canon EOS, 400mm lens, Fujichrome
Velvia.
|
| Well,
that’s about it. I’d love to tell a few more yarns
about encounters with birds, like the morning of the blue ducks
and the frozen river, or the time a couple of keas picked ‘kidney
fat holes’ in raincoat (much like they can do to sheep,
bless them), but there’s no space here. I hope these tips
are helpful - good shooting. |
This
article and images are copyright to Rob L. Suisted - Nature's Pic
Images. All rights reserved.
|